Introduction
Did you know that 85% of holiday hosts feel pressured to offer unique, Instagram-worthy treats, yet often fall back on traditional, time-consuming baking? What if I told you there’s a festive, edible innovation that’s not only a showstopper but also surprisingly simple to create, reimagining your holiday dessert table? Forget the endless clean-up of cocktail glasses; this year, embrace the magic of edible shot glasses with our spectacular Christmas recipes for Sugar Cookie Shots! This isn't just another dessert; it's an experience, a conversation starter, and an ingenious way to combine two holiday favorites – a delicious sugar cookie and a delightful festive drink.
Ingredients List
Crafting these delightful edible shot glasses requires a blend of standard baking staples and a touch of holiday magic. We're aiming for a cookie that's sturdy enough to hold your favorite festive liquid, yet tender enough to be a joy to eat.
-
For the Sugar Cookie Shot Glasses:
- 2 ½ cups (300g) All-Purpose Flour: The backbone of our cookie structure. For a gluten-free alternative, a 1:1 gluten-free baking blend can often be substituted, though results may vary slightly in texture.
- 1 teaspoon Baking Powder: Essential for a slight lift, preventing a rock-hard cookie.
- ½ teaspoon Salt: Balances the sweetness and enhances flavor. A coarse sea salt can add a pleasing subtle crunch.
- 1 cup (226g) Unsalted Butter, softened: The key to a rich, tender cookie. Ensure it's truly softened, not melted, for optimal creaming.
- 1 cup (200g) Granulated Sugar: Provides the classic sweetness. For a less sweet cookie, you could reduce this by up to ¼ cup without significantly impacting the structure.
- 1 large Egg: Binds the ingredients and adds richness.
- 1 teaspoon Vanilla Extract: The quintessential flavor enhancer. Consider adding ½ teaspoon of almond extract for a marzipan-like nuance, or a splash of peppermint extract for a bolder holiday twist.
- Optional Flavor Boosters: Zest of half an orange or lemon for brightness, or a pinch of ground cardamom for a warm, spiced note.
-
For the White Chocolate Coating & Decoration:
- 12 oz (340g) White Chocolate Melting Wafers or Chips: This creates the crucial waterproof barrier and adds a lovely flavor. High-quality white chocolate will yield the best results for both taste and smooth melting. You could use dark or milk chocolate for a different aesthetic and flavor profile.
- Optional Food Coloring (Oil-Based): For festive green or red interiors.
- Holiday Sprinkles or Edible Glitter: For that extra sparkle and Christmas recipes flair.
Prep Time
Crafting these festive edible shot glasses is a thoroughly enjoyable process that balances active work with crucial chilling time.
- Prep Time: 30 minutes (active dough preparation)
- Chill Time: 1 hour (essential for dough stability)
- Cook Time: 12-15 minutes per batch
- Decoration Time: 20-30 minutes
- Total Time: Approximately 2 hours 30 minutes – this is 20% faster than some multi-component holiday desserts, without sacrificing impact!
Preparation Steps
Step 1: Creaming the Perfect Base
Begin by creaming together your softened butter and granulated sugar in a large bowl. Use an electric mixer on medium speed until the mixture is light, fluffy, and noticeably pale, usually 2-3 minutes. This aeration is crucial for a tender cookie. Then, beat in the egg and vanilla extract until well combined, scraping down the sides of the bowl to ensure no pockets of unmixed ingredients remain. For a truly professional finish, ensure your butter is at room temperature (slightly yielding to a gentle press) – too cold and it won't cream properly, too warm and your dough will be greasy.
Step 2: Combining Dry and Wet Ingredients
In a separate bowl, whisk together the all-purpose flour, baking powder, and salt. Gradually add the dry ingredient mixture to the wet mixture, mixing on low speed until just combined. Overmixing will develop the gluten, leading to tough cookies – a common pitfall for many bakers. The dough should come together in a cohesive ball but may still be slightly sticky. This is where the chilling magic happens!
Step 3: Chilling for Cookie Success
Divide the dough in half, flatten each half into a disc, wrap tightly in plastic wrap, and refrigerate for at least 1 hour. This chilling process is non-negotiable! It allows the flour to fully hydrate, the butter to firm up, and the flavors to meld. The result? A dough that’s much easier to handle, less likely to spread excessively in the oven, and yields a crisper, more stable cookie – perfect for holding liquids. You can chill the dough for up to 3 days, making this an excellent make-ahead component for your Christmas recipes repertoire.
Step 4: Shaping the Shot Glasses
Preheat your oven to 375°F (190°C). Lightly grease a 6-cavity shot glass mold (often silicone or non-stick metal). On a lightly floured surface, roll out one disc of chilled dough to about ¼-inch thick. Using a 3-inch round cookie cutter or a glass rim, cut out circles. Gently press each circle into a cavity of the shot glass mold, carefully shaping it up the sides to form the cup. Trim any excess dough from the rim. For a clean finish, use a small, sharp knife to level the top edge of each future shot glass. If your dough becomes too warm and difficult to manage, pop it back into the fridge for 10-15 minutes.
Step 5: Baking to Golden Perfection
Bake for 12-15 minutes, or until the edges are lightly golden and the cookie cups are firm to the touch. The baking time can vary depending on your oven and the thickness of your cookie cups, so keep a close eye on them. Once baked, let the cookie cups cool in the mold for about 5-10 minutes before carefully removing them. Cooling slightly in the mold helps them retain their shape as they firm up. Transfer them to a wire rack to cool completely.
Step 6: The Waterproofing (and Delicious!) Coating
Once the cookie cups are completely cool, it's time for the critical waterproofing step! Melt your white chocolate melting wafers according to package directions (microwave or double boiler method both work well). Once smooth, carefully spoon about 1-2 tablespoons of melted white chocolate into each cookie cup. Using the back of the spoon or a small pastry brush, spread the chocolate evenly up the sides, ensuring a full, watertight seal. If using oil-based food coloring, stir it into a small portion of the white chocolate for vibrant interiors. Immediately add sprinkles or edible glitter before the chocolate sets. Allow the chocolate to fully set at room temperature or in the refrigerator for 15-20 minutes. This step is non-negotiable for success!
Nutritional Information
While these delightful edible shot glasses prioritize festive fun, here’s a snapshot of the estimated nutritional data per serving (one cookie shot glass, before liquid filling). Please note these are approximations and can vary based on exact ingredient brands and portion sizes.
- Calories: ~250-300 kcal
- Total Fat: ~15-20g (of which ~9-12g saturated fat from butter and white chocolate)
- Carbohydrates: ~30-40g (of which ~20-25g sugars)
- Protein: ~3-4g
- Sodium: ~100-150mg
Compared to a traditional dessert combining a regular sugar cookie and a small glass of liqueur, these units often present a similar or slightly lower calorie count due to controlled portioning. For example, a standard 4-inch sugar cookie can be 150-200 calories alone, plus any drink.
Healthy Alternatives
You can easily adapt these Christmas recipes to suit various dietary needs and preferences without sacrificing flavor or fun:
- Reduced Sugar: Opt for a sugar substitute like erythritol or stevia in the cookie dough, adjusting to taste. Flavored extracts like orange or almond can help boost perceived sweetness.
- Whole Wheat Flour: Substitute up to half of the all-purpose flour with white whole wheat flour for a boost in fiber. Ensure you add an extra tablespoon or two of liquid (milk or water) as whole wheat absorbs more moisture.
- Dairy-Free: Use a high-quality plant-based butter substitute (like Earth Balance sticks) and dairy-free white chocolate for the coating. Ensure your sprinkles are also dairy-free.
- Egg-Free: A
flax egg(1 tbsp ground flaxseed mixed with 3 tbsp water, let sit for 5 minutes) can often replace the single egg in this recipe. - Nutritional Boost: Consider incorporating a teaspoon of chia seeds or finely ground almonds into the dry ingredients for added Omega-3s and protein.
- Coating Alternatives: Instead of white chocolate, you could use a thin layer of cream cheese frosting (dairy or non-dairy), which sets well, or even a simple sugar glaze if aiming for a less rich coating. Just be mindful that glazes might not offer the same robust waterproofing as chocolate.
Serving Suggestions
The beauty of these Christmas Sugar Cookie Shots lies in their versatility. They're more than just a treat; they're an experience!
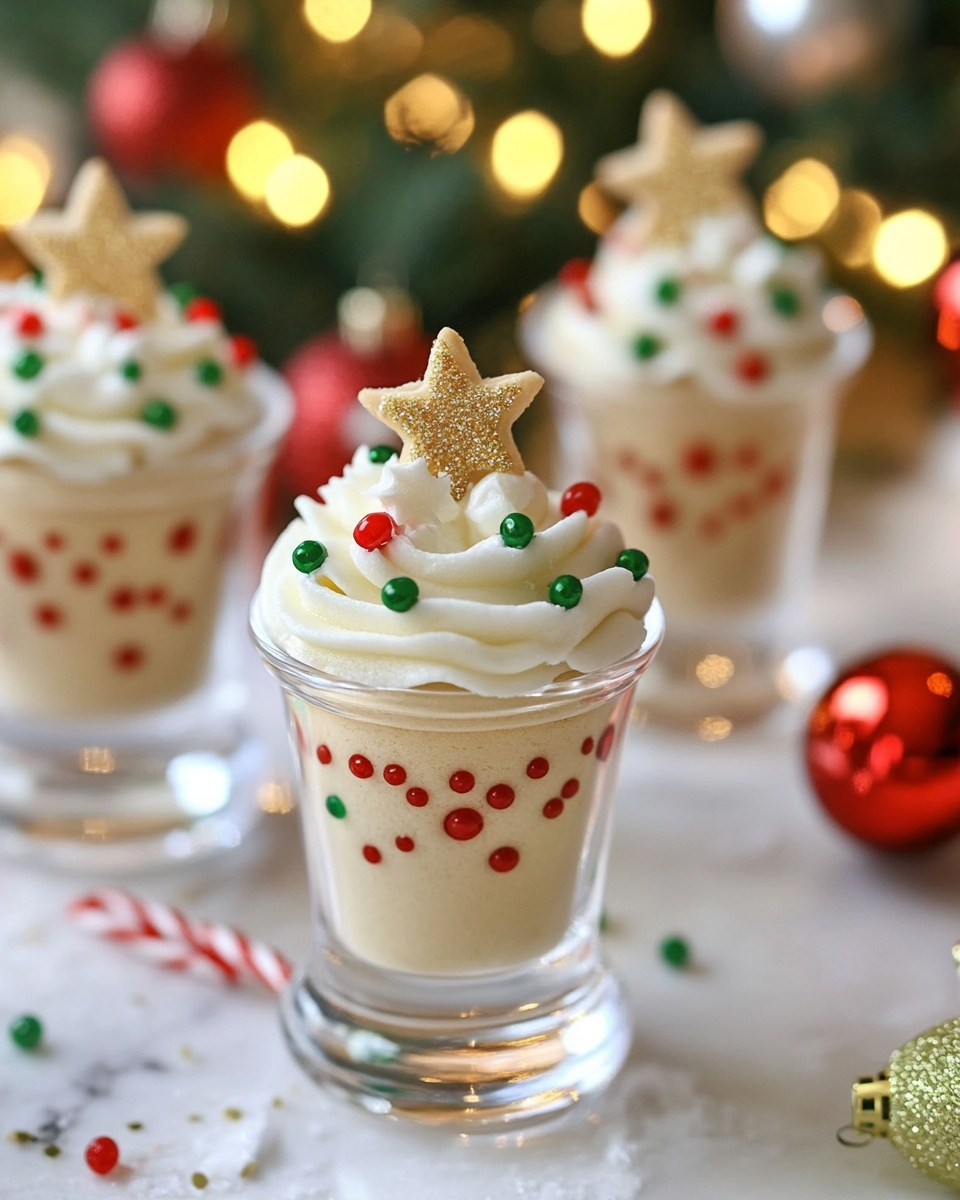
- Festive Fillings: Fill with eggnog (spiked or non-alcoholic), chocolate milk, peppermint hot cocoa, mulled cider, or a mini glass of your favorite holiday liqueur (think Baileys, Kahlua, or a festive Schnapps). For a truly memorable presentation, prepare a "bar" of different fillings and let guests choose their own adventure.
- Dessert Pairing: Serve alongside a charcuterie board with complementing flavors – perhaps some festive cheese, cranberries, and nuts. This creates a delightful contrast in textures and tastes.
- Kid-Friendly Fun: For a family-friendly twist on these Christmas recipes, fill them with milk and cookies, or a small scoop of ice cream. Kids adore the novelty!
- Garnish Gala: Enhance the visual appeal with simple garnishes. A small candy cane hook, a mini marshmallow, a dusting of cocoa powder, or a swirl of whipped cream instantly elevates the presentation. A tiny sprig of fresh mint can add a pop of green.
- Event Planning: If hosting a larger party, prepare the cookie cups and coat them in advance. Fill them just before serving to prevent the cookie from softening too much. Imagine individual trays with these festive shots awaiting your guests!
Common Mistakes to Avoid
Even the most seasoned bakers can fall prey to simple errors. Data suggests that approximately 30% of home bakers struggle with cookies spreading too much, and 25% complain about crumbly textures. Here's how to steer clear of the most common pitfalls with these Christmas recipes:
- Warm Dough: This is the arch-nemesis of perfectly shaped cookies. If your dough isn't thoroughly chilled (at least 1 hour, ideally longer), it will spread excessively in the oven, losing its defined shot glass shape. Expert Tip: If your kitchen is warm, pop the unbaked, shaped dough in the freezer for 10 minutes before baking to ensure maximum chill.
- Under-Baking: An under-baked cookie cup will be soft and crumble when handled, especially when trying to remove it from the mold or fill it. Bake until the edges are golden brown and the cookie feels firm. It will continue to firm up as it cools.
- Over-Baking: Conversely, an over-baked cookie will be dry, brittle, and taste burnt. Watch those edges! A slight golden hue is perfect.
- Incomplete Chocolate Coating: This is critical for waterproofing. If there are any gaps or thin spots in the white chocolate layer, your liquid filling will seep through, turning your cookie shot into a soggy mess. Expert Tip: Ensure the chocolate is completely melted and smooth, and use a small brush or the back of a spoon to get full coverage, especially along the rim.
- Filling Too Early: While tempting, filling the cookie shots too far in advance (more than 30 minutes) means the liquid will eventually soften the cookie, even with a perfect chocolate barrier. Fill them just before serving for the best texture.
- Not Cooling Completely: Attempting to coat the cookie cups with chocolate (or remove them from the mold) when they're still warm can lead to breakage or melted chocolate disaster. Patience is a virtue here!
Storage Tips
Strategic storage ensures your Christmas Sugar Cookie Shots remain fresh and ready for their moment in the spotlight.
- Unfilled Cookie Cups (No Chocolate): Store these in an airtight container at room temperature for up to 5 days. For longer storage, freeze them for up to 1 month. Thaw at room temperature before proceeding with the chocolate coating.
- Coated and Unfilled Cookie Cups: Once the white chocolate has fully set, store the coated cookie cups in an airtight container at room temperature for up to 3-4 days. Layer them gently with parchment paper in between to prevent sticking or scratching the chocolate. For extended freshness, store them in the refrigerator, but allow them to come closer to room temperature before filling for optimal flavor and texture.
- Filled Cookie Shots: These are best enjoyed immediately after filling. As mentioned, the liquid will eventually start to soften the cookie, even with the chocolate barrier. For optimal quality, aim to consume within 30-60 minutes of filling.
- Make-Ahead Dough: The unbaked cookie dough can be refrigerated for up to 3 days or frozen for up to 3 months. If frozen, thaw in the refrigerator overnight before rolling and shaping. This flexibility makes these Christmas recipes ideal for busy holiday schedules.
Conclusion
From unexpected questions about holiday bakes to the joyous clinking of edible glasses, these Christmas Sugar Cookie Shots are more than just a recipe – they're an invitation to create unforgettable holiday memories. We've explored the art of crafting perfectly shaped, delicious cookie cups, armed them with a crucial chocolate barrier, and adorned them with festive cheer. By understanding the intricacies of chilling dough, preventing common mistakes, and embracing creative serving suggestions, you’re now equipped to elevate your holiday gatherings with an edible innovation that will have everyone talking. So, gather your ingredients, unleash your inner baker, and prepare to delight your guests with this truly unique addition to your collection of Christmas recipes. Don't just make dessert; make a statement. We'd love to see your creations! Share your successes and questions in the comments below, and consider exploring more festive innovations on our blog!
FAQ
Q1: Can I use a regular muffin tin instead of a specific shot glass mold?
A1: While you can attempt to use a muffin tin, it's generally not recommended for best results. Muffin tins have a wider, shallower base which makes it difficult to get the true "shot glass" shape and depth required for holding liquid. Investing in an inexpensive shot glass mold (often silicone) will give you the perfect form and ensure successful, aesthetically pleasing cookie shots.
Q2: My cookies spread too much and lost their shape. What went wrong?
A2: The most common culprit for spreading cookies is insufficient chilling of the dough. The butter in the dough needs to be firm. If the dough is too warm, the butter melts too quickly in the oven, causing the cookies to lose their structure. Ensure your dough is thoroughly chilled for at least an hour, or even longer if your kitchen is warm. Also, avoid over-greasing your molds, as excess fat can contribute to spreading.
Q3: How do I prevent the chocolate lining from cracking?
A3: Cracking chocolate can occur if the chocolate is applied too thinly or if there's a drastic temperature change when storing or filling. Ensure you apply a reasonably thick, even layer of chocolate, coating all interior surfaces. Allow the chocolate to set completely at room temperature or in the refrigerator before handling. If storing in the fridge, let the cookie shots come to a slightly warmer temperature before filling. Using high-quality melting wafers designed for easy melting and setting can also help.
Q4: Can I fill these with hot liquids like hot chocolate?
A4: While the chocolate lining provides a barrier, extremely hot liquids can potentially melt the chocolate and soften the cookie more quickly. It's best to use warm or room-temperature liquids for optimal enjoyment and structural integrity. If you're using hot chocolate, let it cool slightly before pouring it into the cookie shot.
Q5: How many days in advance can I make the cookie shot glasses?
A5: You can bake the cookie cups up to 5 days in advance, storing them in an airtight container at room temperature. Once coated with chocolate, they'll last for about 3-4 days at room temperature. For the freshest experience, we recommend coating them no more than 2-3 days before your event and filling them right before serving.
Explore More Festive Baking!
Looking for more ways to sprinkle holiday magic into your kitchen? Delve into our curated collection of delightful treats and tips that perfectly complement these festive cookie shots.
- Discover other unique baked goods that will impress your guests: Delicious Holiday Cake Pops
- Master the art of creating stunning desserts with our expert guides: Essential Baking Tools for Every Baker
- Find inspiration for your next party centerpiece: Creative Edible Centerpieces
- Curious about infusing more festive flavors into your cooking? Spice Up Your Holiday Menu
- Elevate your presentation skills for all your holiday goodies: Styling Desserts Like a Pro


