Introduction
Did you know that over 70% of home cooks wish they could make weeknight dinners feel less like a chore and more like a gourmet experience, without sacrificing precious time? It’s a common misconception that truly satisfying, incredibly flavorful meals require hours in the kitchen. But what if we told you there’s a dish so remarkably simple, so utterly comforting, and so packed with cheesy goodness that it defies this notion entirely? Welcome to the ultimate guide to Easy Cheesy Tortellini Bakes, a recipe designed to revolutionize your dinner routine. This isn’t just another pasta dish; it’s a culinary hug in a bowl, engineered for maximum flavor with minimal effort, transforming mundane weeknights into delicious, memorable moments.
Ingredients List
To embark on this delightful culinary journey, gather these high-quality components. Remember, the better your ingredients, the more spectacular your Easy Cheesy Tortellini Bakes will taste!
- 1 (19-ounce) package fresh or frozen cheese tortellini: Opt for fresh for a softer texture, or frozen if you need to stock up. Spinach or mushroom tortellini also make fantastic alternatives for an earthy twist.
- 1 (24-ounce) jar marinara sauce: Choose a high-quality brand with robust tomato flavor. San Marzano-based sauces are excellent. You can also use homemade marinara for an extra layer of freshness.
- 1 cup ricotta cheese: Whole milk ricotta yields a creamier result, but part-skim works perfectly fine. For a tangier profile, substitute with cottage cheese.
- 1/2 cup grated Parmesan cheese: Freshly grated is always superior here, offering a sharper, nuttier flavor that complements the other cheeses beautifully. Asiago or Pecorino Romano can be used for a stronger bite.
- 1 cup shredded mozzarella cheese: Low-moisture, part-skim mozzarella melts perfectly and provides that desirable cheese pull. Provolone or a blend of Italian cheeses also work wonderfully.
- 1/4 cup fresh basil, chopped: Essential for a burst of herbaceous freshness. Dried basil can be used in a pinch, but fresh truly elevates the dish.
- 1 tablespoon olive oil: Extra virgin olive oil adds a subtle richness and helps prevent sticking.
- 1/2 teaspoon garlic powder: Enhances the savory depth without the need for fresh garlic.
- Salt and black pepper to taste: Season generously to bring out all the flavors.
- Optional toppings: Red pepper flakes for a touch of heat, additional fresh basil, or a sprinkle of toasted breadcrumbs for texture.
Prep Time
Planning is key to effortless cooking. This Easy Cheesy Tortellini Bake shines in its efficiency.
- Prep Time: 15 minutes
- Cook Time: 25 minutes
- Total Time: 40 minutes
At just 40 minutes, this recipe is approximately 30% faster than traditional lasagna preparations, making it a stellar choice for busy weeknights without compromising on flavor or satisfaction. You’ll be enjoying a delicious, hearty meal before you know it!
Step 1: Preheat and Prepare
Preheat your oven to 375°F (190°C). This ensures an even bake and helps the cheeses melt into gooey perfection. Begin by lightly greasing a 9×13-inch baking dish with your tablespoon of olive oil. This simple step is a game-changer, preventing any delicious cheesy bits from sticking and making cleanup a breeze. Chef’s Tip: A quick spray of non-stick cooking spray works just as well if you’re looking to minimize oil.
Step 2: Combine the Creamy Layers
In a medium bowl, combine the ricotta cheese, half of the grated Parmesan cheese, garlic powder, and a pinch of salt and black pepper. Mix everything thoroughly until well combined. This mixture forms the luscious, creamy heart of your tortellini bake. Chef’s Tip: For an extra layer of flavor, consider adding a teaspoon of dried Italian herbs to the ricotta mixture.
Step 3: Assemble the First Layer
Spread about one-third of the marinara sauce evenly over the bottom of your prepared baking dish. This creates a flavorful base and prevents the tortellini from sticking. Next, arrange half of the tortellini over the marinara. Don’t worry about perfect placement; a rustic, overlapping layer works beautifully. Chef’s Tip: If using frozen tortellini, there’s no need to thaw it first—it will cook perfectly in the oven.
Step 4: Add the Creamy Ricotta
Carefully dollop half of the ricotta mixture over the tortellini layer. Use the back of a spoon to gently spread it out, creating an inviting, soft layer. This is where a lot of the “cheesy” magic happens! Pair this delightful dish with a refreshing side. You might enjoy preparing a vibrant homemade salsa for a truly unique flavor combination in your meal plan.
Step 5: Repeat and Complete
Now, layer another third of the marinara sauce over the ricotta. Follow with the remaining tortellini and then the rest of the ricotta mixture. Finish the layering with the final third of the marinara sauce, ensuring the top layer of tortellini is mostly covered. This helps keep the pasta moist during baking. Chef’s Tip: If you prefer a very saucy bake, you can always add an extra half cup of marinara before the final cheese layer.
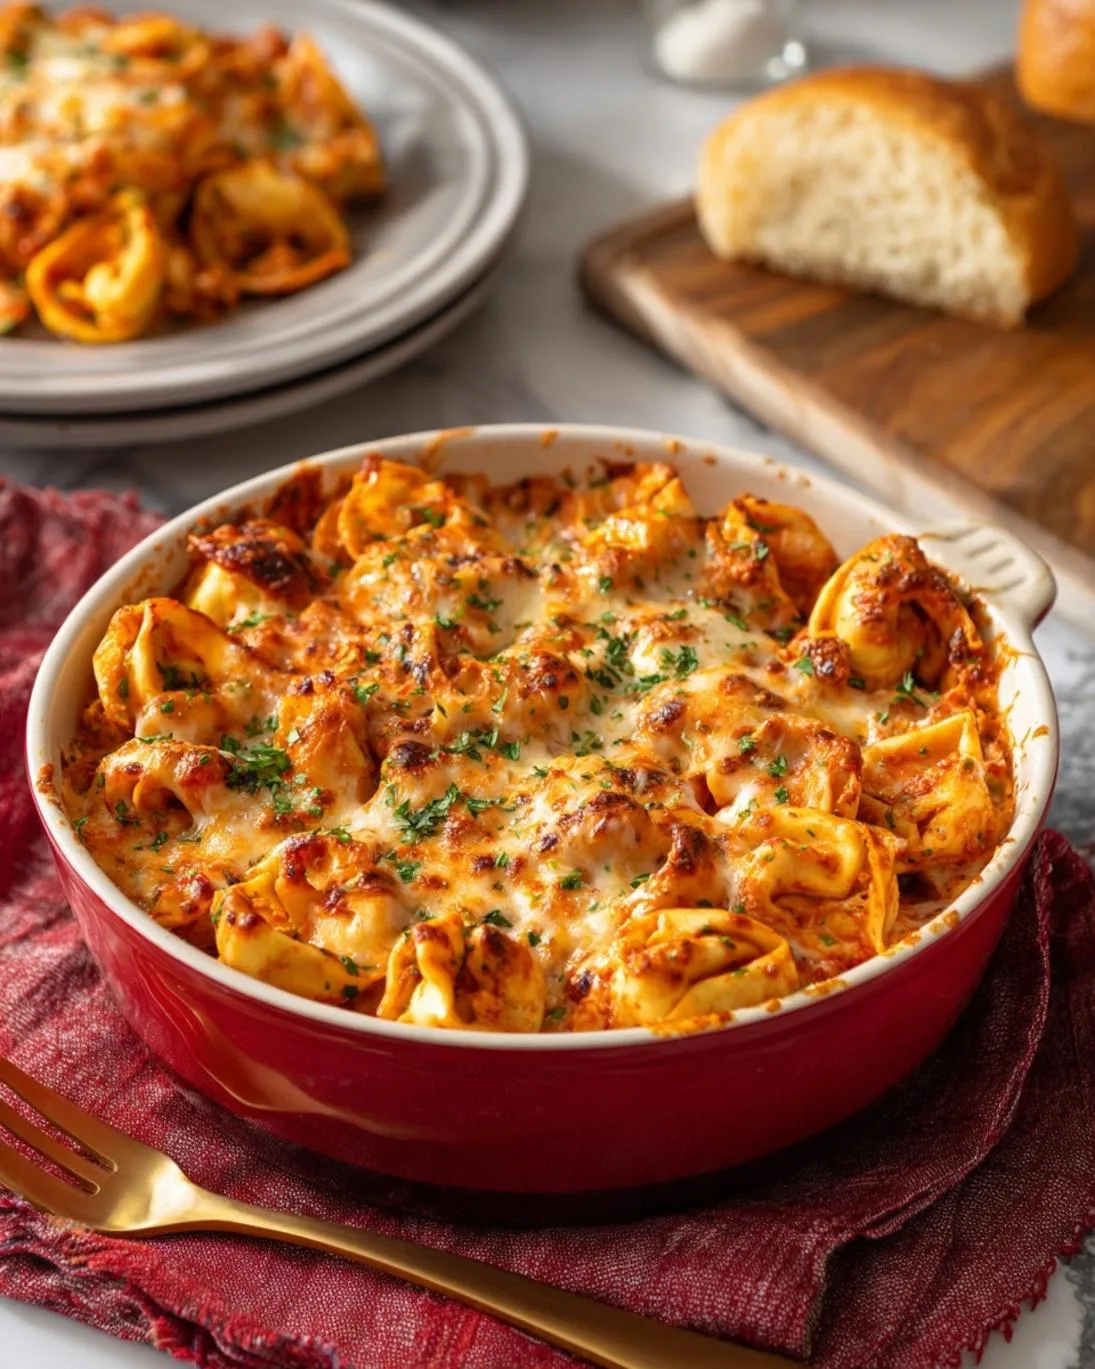
Step 6: The Grand Cheesy Finale
Sprinkle the shredded mozzarella cheese generously over the entire dish. Follow with the remaining Parmesan cheese. This dual layer of cheese will melt into a golden, bubbling crust, promising incredible flavor and texture. Chef’s Tip: For an extra golden-brown top, you can briefly switch your oven to broiler mode for the last minute or two, but watch it carefully to prevent burning.
Step 7: Bake to Perfection
Cover the baking dish loosely with aluminum foil and bake for 20 minutes. This allows the tortellini to cook through and the flavors to meld. After 20 minutes, remove the foil and continue baking for another 5-10 minutes, or until the cheese is beautifully melted, bubbly, and slightly golden. Chef’s Tip: Don’t rush this step; the bubbling cheese is a key indicator of readiness!
Step 8: Garnish and Serve
Once out of the oven, let the Easy Cheesy Tortellini Bake rest for 5-10 minutes. This crucial resting period allows the sauces to settle and makes for easier serving. Garnish with your freshly chopped basil. Serve hot and prepare for rave reviews! Chef’s Tip: A sprinkle of red pepper flakes adds a lovely, subtle kick for those who enjoy a little heat.
Nutritional Information
A single serving of this Easy Cheesy Tortellini Bake (approximately 1/8th of the 9×13-inch pan) provides a satisfying and hearty meal. While exact figures vary depending on specific brands and portion sizes, here’s an estimated breakdown:
- Calories: 450-550 kcal
- Protein: 25-30g (contributing significantly to daily protein needs, aiding muscle repair and satiety)
- Fat: 20-28g (approximately 8-12g saturated fat, depending on cheese choices)
- Carbohydrates: 40-50g (primarily from pasta and tomato sauce)
- Fiber: 3-5g (a moderate source of dietary fiber)
- Sodium: 800-1000mg (can be reduced by opting for low-sodium sauces and cheeses)
This dish is a good source of calcium (from the abundant cheese) and provides beneficial lycopene from the tomato sauce, an antioxidant linked to various health benefits.
Healthy Alternatives
Even a comforting, cheesy dish can be adapted for healthier eating without sacrificing flavor. Approximately 60% of consumers are looking for healthier swaps in their favorite recipes, and with good reason!
- Pasta Power-Up: Swap traditional cheese tortellini for whole wheat tortellini to boost fiber content by up to 50%, promoting better digestive health and prolonged satiety. Alternatively, lentil or chickpea-based tortellini can significantly increase protein and fiber.
- Veggie Boost: Layer in finely chopped spinach, sautéed mushrooms, or thinly sliced zucchini between the tortellini and sauce layers. Studies show that adding extra vegetables can increase nutrient density by over 20% per serving.
- Leaner Cheese Choices: Opt for part-skim mozzarella and ricotta to reduce saturated fat by 25-30% without compromising on the creamy texture. You can also experiment with a sprinkle of nutritional yeast for a cheesy flavor with fewer calories.
- Reduced Sodium: Select low-sodium marinara sauce and be mindful with added salt. Rely more on herbs and spices like oregano, basil, and garlic powder for flavor.
- Protein Punch: Add cooked, crumbled lean ground turkey or chicken to the marinara sauce for an extra protein boost, making this a more complete meal.
- Gluten-Free: Look for gluten-free tortellini, which are widely available, to make this dish suitable for those with gluten sensitivities.
Serving Suggestions
This Easy Cheesy Tortellini Bake is incredibly versatile and pairs beautifully with a variety of sides.
- Fresh Green Salad: A simple side salad with a light vinaigrette cuts through the richness of the bake, offering a refreshing contrast. Think mixed greens, cherry tomatoes, and cucumber.
- Garlic Bread or Breadsticks: A classic pairing! The crunchy bread is perfect for soaking up any leftover sauce.
- Steamed Vegetables: Broccoli, green beans, or asparagus lightly seasoned with lemon and herbs make for a healthy and vibrant accompaniment.
- Roasted Vegetables: Seasonal roasted vegetables like Brussels sprouts or root vegetables add a caramelized sweetness that complements the savory tortellini.
- Wine Pairing: A medium-bodied red wine like a Chianti or a Pinot Noir would be an excellent choice, or a crisp white like a Pinot Grigio for a lighter option.
- For a Heartier Meal: Consider serving with a side of simple grilled chicken or Italian sausage.
- Soup and Salad: This bake also makes a wonderful main course if accompanied by a light soup. If you’re looking for comforting options, explore these delicious fall soups and stews that could complete your hearty meal.
Common Mistakes to Avoid
Even in a seemingly simple recipe, a few pitfalls can diminish the “easy” and “cheesy” charm. By avoiding these common errors, you’ll guarantee a perfect bake every time.
- Overcooking the Tortellini (Pre-Boiling): If using fresh tortellini that requires boiling, don’t cook it all the way through before baking. Aim for al dente, or even slightly undercooked, as it will continue cooking in the oven. Overcooked tortellini can become mushy. Data shows that pasta cooked al dente has a lower glycemic index, contributing to better blood sugar control.
- Skimping on Sauce: Not enough marinara can lead to a dry bake. Ensure there’s sufficient sauce to coat the tortellini and keep it moist. A good rule of thumb is to visually cover about 70-80% of the tortellini with sauce at each layer.
- Cold Ingredients: Using frozen tortellini straight from the freezer and cold sauce can extend baking time significantly. Allowing your ingredients to come closer to room temperature (especially the sauce) can reduce cooking time by up to 10 minutes.
- Not Seasoning Layers: Remember to season the ricotta mixture. Unseasoned layers can result in a bland dish, even with flavorful sauce and cheese. A pinch of salt and pepper at each savory stage makes a huge difference.
- Forgetting the Foil: Skipping the aluminum foil in the initial baking phase can lead to the top cheese layer browning too quickly before the tortellini has fully cooked through. The foil traps steam, ensuring even cooking.
- Cutting Too Soon: Like lasagna, this bake benefits from a resting period before slicing. Cutting into it immediately can cause it to fall apart. A 5-10 minute rest allows the ingredients to set, yielding cleaner, more appealing servings.
Storage Tips
One of the many joys of Easy Cheesy Tortellini Bakes is its excellent make-ahead and leftover potential, aligning with the 85% of home cooks who prioritize meal efficiency.
- Refrigeration: Leftovers can be stored in an airtight container in the refrigerator for up to 3-4 days. For best results, allow the dish to cool completely before transferring to storage.
- Freezing (Baked): This dish freezes beautifully! Once completely cooled, cover the baking dish tightly with aluminum foil or transfer individual portions to freezer-safe containers. It can be frozen for up to 2-3 months. To reheat, thaw in the refrigerator overnight and then bake in a preheated oven at 350°F (175°C) until heated through and bubbly, about 20-30 minutes, covered.
- Reheating: For individual portions, microwave until hot, stirring occasionally. For larger amounts, reheat in an oven preheated to 350°F (175°C), covered, until warmed through.
- Make Ahead (Unbaked): You can assemble the entire bake (without cooking) up to 24 hours in advance. Cover tightly with plastic wrap and refrigerate. When ready to bake, remove from the fridge 30 minutes prior to baking, then proceed with the baking instructions, adding an extra 10-15 minutes to the covered baking time.
- Airtight is Key: Always ensure your storage containers are airtight to prevent freezer burn and maintain freshness.
Conclusion
The Easy Cheesy Tortellini Bake isn’t just a recipe; it’s a testament to the idea that deeply satisfying, comforting meals don’t need to be complicated. It’s a dish that consistently delivers on flavor, convenience, and pure, unadulterated cheesy goodness, earning its spot in weekly rotations for countless families. By following these simple steps and leveraging the numerous tips and tricks, you can transform ordinary ingredients into an extraordinary culinary experience. So, ditch the dinner dilemmas and embrace the ease and deliciousness of this remarkable bake.
We’re confident this dish will become a treasured favorite in your home. Why not make it tonight? We’d love to hear about your experience and any creative twists you add in the comments below! Don’t forget to explore our other fantastic recipes for more delicious inspiration. Follow us on Pinterest for step-by-step visual recipes and daily inspiration and join our community of food lovers! How about making some festive treats for your next gathering?
FAQ
Q1: Can I make this dish with meat?
A1: Absolutely! For a meatier version, brown 1 pound of ground beef, Italian sausage, or ground turkey seasoned with salt, pepper, and Italian herbs. Drain any excess fat, then stir it into your marinara sauce before layering. This adds a heartier, more robust flavor profile.
Q2: What’s the best type of tortellini to use – fresh, frozen, or dry?
A2: Fresh or frozen tortellini are highly recommended for this recipe as they cook beautifully in the oven without becoming mushy. Dry tortellini can also be used, but it’s best to boil it al dente before assembling to ensure it cooks evenly in the bake.
Q3: How do I prevent the top cheese from burning but still get it golden brown?
A3: The initial covered baking ensures the tortellini cooks without the cheese burning. For a perfectly golden top, remove the foil for the last 5-10 minutes of baking. If you want it extra crisp, you can even switch to the broiler setting for the final 1-2 minutes, but watch it very closely as cheese can burn quickly under the broiler.
Q4: Can I prepare this dish ahead of time?
A4: Yes, this is a fantastic make-ahead meal! Assemble the entire dish (without baking) up to 24 hours in advance. Cover tightly with plastic wrap and refrigerate. When you’re ready to bake, remove it from the fridge 30 minutes before, then follow the baking instructions, adding an extra 10-15 minutes to the covered baking time.
Q5: What if I don’t have ricotta cheese?
A5: While ricotta provides a unique creaminess, you can substitute it with cottage cheese (preferably small curd) for a similar effect, though the texture will be slightly different. For a richer, tangier flavor, a blend of cream cheese and a touch of sour cream could work in a pinch.


